Using Lens Shading Correction
Application Note Description
This application note describes the lens shading feature, how to create and load a calibration file, and how to correct images with the lens shading artifact.
Firmware with this feature is available to download from the form to the right for the following models:
- BFS-U3-32S4
- BFS-U3-50S5
More models will be supported soon!
Overview
Lens shading is an imaging artifact where the corners or edges of an image are darker than the center. It is caused by the reduction of the amount of light received by the sensor at the periphery of the image due to the characteristics of the lens.
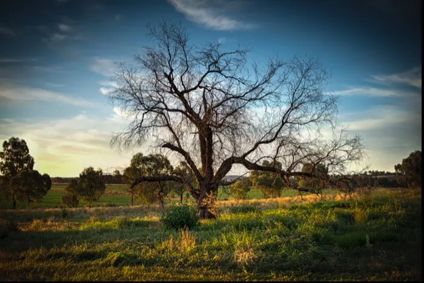
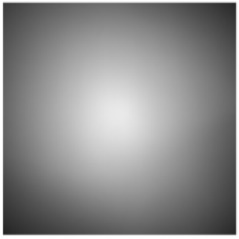
Lens shading can be corrected by using a calibrated image based on the optics and lighting used in the application. Lens shading correction then adjusts the intensity at different points of the image to achieve a more uniform brightness.
|
Len Shading Example |
After Lens Shading Correction |
 |
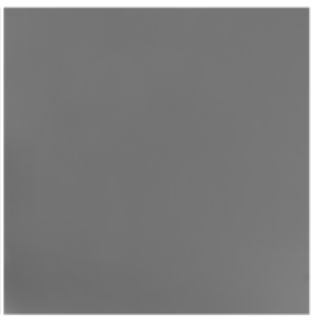 |
Once a calibration file has been created it can be deployed across multiple cameras. If there is a change in the imaging environment, a new calibration file can be created and redeployed. The calibration file can be created in a test environment with different lighting and camera settings than used in a production system as long as the calibration image is uniform.
Using Lens Shading Correction
Lens shading correction can only be enabled if there is a valid calibration file loaded on the camera. The calibration file can be created by the camera or loaded from an existing calibration file saved to a disk. The calibration file is saved across power cycles of the camera. There can be up to two calibration files saved to a camera.
Creating a Calibration File
To create a calibration file:
1. Open the SpinView application and from the Feature pane select the Lens Shading tab.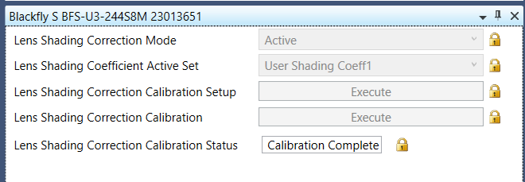
2. Ensure the Lens Shading Correction Mode is set to OFF.
3. From the Lens Shading Coefficient Active Set select where to save the file.
4. Execute Lens Shading Correction Calibration Setup. This changes the camera’s settings as follows:
- Maximum resolution
- No binning or decimation
- Auto gain enabled
- Auto white balance enabled
- 8-bit pixel format selected
- Black level clamping enabled (if applicable)
- Black level set to 0
5. The camera is now in an ideal state to prepare a target scene:
a) Ensure the scene is a uniform plain target without artifacts.
b) Ensure an appropriate lens is attached to the camera.
c) Start acquisition in the streaming window.
d) Verify your scene has stabilized (for auto exposure and white balance) and check for any image artifacts.
e) Stop acquisition.
6. Execute Lens Shading Correction Calibration. This begins the calibration process which takes ~10 seconds after which a file is saved to the selected Coefficient Active Set.
7. The Lens Shading Correction Calibration Status displays a message:
- Calibration Complete—the file was created successfully
- Saturated—the file is brighter than expected; the average is 80% of the maximum pixel value
- Low Region—one or more of the regions has no signal; one region's average creates full gain coefficient or has 0 average pixel value
- Calibration Incomplete—no calibration file has been created with this camera yet, or the current calibration was stopped without a successful result
8. After the file is saved, the Lens Shading Correction mode is automatically set to Active.
9. Start acquisition.
Downloading a Calibration File from a Camera
Once a valid calibration file has been created, you can download it to make available for other cameras.
- Open the SpinView application and from the Feature pane select the File Access tab.
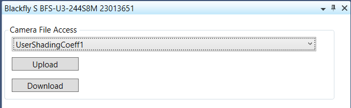
- From the Camera File Access drop-down, select the file.
- Click Download and select a location to save the file.
Uploading a Calibration File to a Camera
If you want to use an existing calibration file created on a different camera you can load this using the File Access feature.
- Open the SpinView application and from the Feature pane select the File Access tab.
- From the Camera File Access drop-down, select where you want to save the file.
- Click Upload and select the file.
- Once the file is saved to the camera, Lens Shading can be enabled.
Enabling Lens Shading Correction on a Camera
Once a valid calibration file is present on the camera – either by creating or uploading – Lens Shading can be enabled.
To enable lens shading correction:
- Open the SpinView application.
- From the Feature pane select the Lens Shading tab.
- From the Lens Shading Coefficient Current Active Set drop-down, select the calibration file.
- From the Lens Shading Correction Mode drop-down, select Active.
Note: if the mode is greyed out it could mean the file selected is not a valid calibration file.
- Start acquisition.
Troubleshooting
There is a grid pattern in the dark regions of my image
In some cases where the lens is significantly smaller than the camera sensor size, a high level of gain in the dark areas may cause a grid patterned image artifact. If this artifact is observed in your image, you can:
- Set the Lens Shading Correction Calibration Gain Limit to a lower value and recreate the calibration file. This limit applies only to the calibration and is not saved across a power cycle.
Or,
- Select a different lens to pair with your camera. For guidance on this, see Selecting a Lens for Your Camera.