Getting Started with Firefly-DL in Linux
Applicable products
Firefly®-DL
Application note description
This application note describes how to create an inference network file for the Firefly-DL camera using Linux.
Related articles
- Neural Networks Supported by the Firefly-DL
- Tips on creating Training Data for Deep Learning Neural Networks
- Troubleshooting Neural Network Conversion Issues
- Getting Started with Firefly-DL in Windows
- Getting Started with Training a Caffe Object Detection Inference Network
Preparing for use
Before you use your camera, we recommend that you are aware of the following resources available from our website:
- Camera Reference for the camera—HTML document containing specifications, EMVA imaging, installation guide, and technical reference for the camera model. Replace <PART-NUMBER> with your model's part number:
http://softwareservices.flir.com/<PART-NUMBER>/latest/Model/Readme.html
For example:
http://softwareservices.flir.com/FFY-U3-16S2M-DL/latest/Model/Readme.html - Getting Started Manual for the camera—provides information on installing components and software needed to run the camera.
- Technical Reference for the camera—provides information on the camera’s specifications, features and operations, as well as imaging and acquisition controls.
- Firmware updates—ensure you are using the most up-to-date firmware for the camera to take advantage of improvements and fixes.
- Tech Insights—Subscribe to our bi-monthly email updates containing information on new knowledge base articles, new firmware and software releases, and Product Change Notices (PCN).
Overview
The Firefly-DL is a highly compact, low power consumption machine vision camera that can be trained to detect user-defined objects.
This article goes over the necessary steps to:
- Re-train a pre-trained neural network using transfer learning
- Convert your network to a Movidius-specific format
- Deploy your inference network to a Firefly-DL camera and run "inference on the edge"
Transfer learning is when you take an existing neural network designed and trained for a certain task and re-train part of it to accomplish your task. This approach is much faster than training your own network from scratch and results in an equally good inference network. Once you've deployed your re-trained network onto the Firefly-DL camera, it can apply deep learning on the images that it's streaming - straight on the camera.
If you want to go straight into testing the inference functionality on Firefly-DL using the preloaded cat and dog inference network, go to Test deep learning with SpinView, below.
Install and configure system
The process of training a neural network, creating a inference network file and converting it to a format for the Firefly-DL, requires a specific set of software and dependencies to be installed.
To ensure that the software installs and runs properly, FLIR recommends starting with a fresh system, as software conflicts may occur if the software is already installed. If you need to use an old system setup, it is recommend to install everything (except for Spinnaker) in a virtual environment.
The following software is required:
- Linux Ubuntu 16.04/18.04
- Spinnaker SDK 1.27 or newer (contact Support for Beta build)
- Movidius NCSDK 2.05.00.02
- TensorFlow 1.7 and TensorFlow for poets
Linux Ubuntu
FLIR tested Ubuntu 16.04 and 18.04. We do not support Ubuntu ARM.
Spinnaker SDK
The GUI application for camera evaluation SpinView comes included in the Spinnaker SDK. SpinView is required to stream and view inference data on the Firefly-DL.
Movidius SDK for Neural Compute Stick (NCSDK)
NCSDK includes a set of software tools to compile, profile, and check (validate) DNNs as well as the Intel® Movidius™ Neural Compute API (Intel Movidius NCAPI) for application development in C/C++ or Python (we use Python). Tensorflow and Caffe are included in the NCSDK installation.
1. To download NCSDK 2.05.00.02, in terminal use the following command:
git clone -b v2.05.00.02 --single-branch https://github.com/movidius/ncsdk.git
2. If using Ubuntu 18.04, open install.sh file and in Line32 replace 1604 with 1804.
3. Navigate to the ncsdk folder in terminal then run the following command to install:
make install
TensorFlow
TensorFlow is an end-to-end open source platform for machine learning. We use this to create an inference network file and convert that into a Firefly-DL compatible format. Inference network files are created when retraining a network to use new training data.
By default, TensorFlow 1.7 is installed with NCSDK; this is the version we used in our testing setup.
It is possible to install a different version, TensorFlow-GPU, which greatly speeds up your training if you have a compatible GPU. If you require TensorFlow with GPU support, we recommend that you install this separately from the NCSDK.
TensorFlow for poets
TensorFlow for poets is a tutorial created by Google, which contains scripts that show how to train a new top layer for a neural network, with the goal being to recognize other classes of images. We use this for Example 1 below. Download the zip file and unzip onto your desktop.
To download:
1. Open terminal, navigate to your desktop and enter the following command:
git clone https://github.com/googlecodelabs/tensorflow-for-poets-2
2. Change to the folder you downloaded:
cd tensorflow-for-poets-2
3. In this location download the training data:
curl http://download.tensorflow.org/example_images/flower_photos.tgz | tar xz -C tf_files
The training data is photos of a variety of flowers: daisies, dandelions, roses, sunflowers, and tulips.
Convert neural networks
The Firefly-DL supports two different types of neural networks: classification and object detection.
Classification indicates the best option from a list of predetermined options; the camera gives a percentage that determines the likelihood of the current image being one of the classes it has been trained to recognize.
Object detection indicates the most likely class given a set of predetermined options. Object detection can also provide a location within the image (in the form of a "bounding box" surrounding the class), and can detect multiple objects in the same image.
We provide an example of each type of neural network below.
Inference network files are created when training a network to use new training data.
Python code does not parse line breaks. This application note provides code snippets with the line breaks removed for ease of copying and pasting. We also provide the code snippets with line breaks for readability.
Example 1: Classifying flowers (TensorFlow)
This example shows how to use TensorFlow to create an inference network file using a mobilenet neural network, then how to convert that file to a format compatible with the Firefly-DL.
Part 1 Create Inference Network File
- In terminal navigate to your tensorflow-for-poets-2 folder (it should be on your desktop).
- Copy and paste the following code with line breaks removed into terminal:
| Code | Code with line breaks removed |
|
python3 -m scripts.retrain \ |
python3 -m scripts.retrain --how_many_training_steps=500 --output_graph=tf_files/retrained_graph.pb --output_labels=tf_files/retrained_labels.txt --architecture=mobilenet_0.50_224 --image_dir=tf_files/flower_photos |
| Argument | Description |
|---|---|
| how_many_training_steps | The number of training steps used to train the network. Larger values take more time but provide higher accuracy (diminishing returns applies). You can modify this once you get an inference network file and can see the desired output. We determined 500 to be a good value for this example. |
| output_graph | The output inference network file name and location (used in part 2). |
| output_label | The file name and location for the labels being used for the inference network file (used in part 2). |
| architecture | The neural network being used. This can be replaced by any of the variations of mobilnet, except for mobilenet_ssd. |
| image_dir | The location of the training data (images) being used. You can replace this with custom training data so long as you keep the same folder structure and the images are in jpeg format. For example: animals/dog/dogphoto2.jpg. The name of each photo does not matter. |
The files "retrained_graph.pb" and "retrained_labels.txt" are generated in the tf_files folder.
Depending on your system, this may take up quite a bit of CPU power and time.
Part 2 Convert Inference Network File
FLIR has created a conversion file for your use.
- Download the tensorflow_graph_transform.py file from: https://flir.boxcn.net/s/9zvy9ucbwiz69qb70dy5hi8ojksm2pz1.
- Place the file in the tensorflow-for-poets-2 folder.
- In terminal navigate to your tensorflow-for-poets-2 folder.
- Copy and paste the following code with line breaks removed into terminal:
| Code | Code with line breaks removed |
|
python3 tensorflow_graph_transform.py \ |
python3 tensorflow_graph_transform.py -input=tf_files/retrained_graph.pb -innodes='input' -outnodes='final_result' -width=224 -height=224 -channels=3 -output=tf_files/optimized_graph.pb |
| Argument | Description |
|---|---|
| input | The input inference network file made in part 1. |
| innodes | The input node name (used in step 5). |
| outnodes | The output node name (used in step 5). |
| channels | Bytes per pixel for training data: 3 for color and 1 for mono. |
| output | The file name and location for the output inference network file (used in step 5). |
1. Copy and paste the following in terminal:
mvNCCompile -s 7 tf_files/optimized_graph.pb -in=input -on=final_result -o InferenceNetwork
Once complete, the Inference Network file simply titled "InferenceNetwork" will be found in the tensorflow-for-poets-2 folder.
If you see the error ImportError: cannot import name '_validate_lengths', try to fix using the following command:
pip3 install -U scikit-image
| Argument | Description |
|---|---|
| mvNCCompile - s 7 | The number of shave cores that are used to a maximum of 7. |
| tf_files/optimized_graph.pb | The inference network file and location created in step 4. |
| -in | The text value assigned for inputs (input node/layer name) in step 4. |
| -on | The text value assigned for outputs (output node) in step 4. |
| -o InferenceNetwork | The output inference network file name and location |
Example 2: People object detection (SSD-Caffe)
In this example, we demonstrate how to convert a pre-existing caffe model to a Firefly-DL camera compatible inference network file.
Due to the extensive setup involved, we have provided a separate article that goes over training an object detection graph, titled "Getting Started with Training a Caffe Object Detection Inference Network"
Note: Part 2 of this example can be skipped if you plan on using the pre-trained model.
Part 1 Download MobileNet-SSD repo
1. Ensure NCSDK 2.05.00.02 is properly installed with caffe on a fresh Ubuntu 18.04 or 16.04 system.
2. In terminal run the following command to set PYTHONPATH:
export PYTHONPATH="${PYTHONPATH}:/opt/movidius/caffe/python"
3. Change directory to $CAFFE_ROOT/examples:
cd /opt/movidius/caffe/examples/
4. Download MobileNet-SSD repo:
git clone https://github.com/chuanqi305/MobileNet-SSD.git
5. Change directory to the MobileNet folder:
cd MobileNet-SSD/
Part 2 Optimize Inference Network File*
*Note: This step is only necessary when converting a third-party inference network file to a Firefly compatible format, and the file is not already in a Movidius compatible format. Skip this section when using the pre-trained file downloaded in part 1.
- Download the 2 python scripts:
modify_caffe_model.py [https://flir.boxcn.net/s/78jxss76xapd2cibdhqgixphqej3zn4f]
caffe_pb2 [https://flir.boxcn.net/s/khmvjtvy40g8yluoa1pfomrr9hlrw7xd] - Copy both of them into the current directory: /opt/movidius/caffe/examples/MobileNet-SSD
- Run the modify_caffe_model.py script to optimize the _iter_*.caffemodel and *_deploy.prototxt files. Using the caffemodel and deploy.prototxt files found in mobilenet-ssd (the current directory) as an example, you can use the following command with line breaks removed:
| Code | Code with line breaks removed |
|
python3 modify_caffe_model.py |
python3 modify_caffe_model.py /opt/movidius/caffe/examples/MobileNet-SSD/mobilenet_iter_73000.caffemodel /opt/movidius/caffe/examples/MobileNet-SSD/deploy.prototxt |
This creates an output folder under the current directory and generates optimized.caffemodel and optimized.prototxt files under the this folder.
Part 3 Convert Inference Network File
This step outputs a file that is compatible with the Firefly-DL camera.
If you skipped part 2, in terminal, run the following command:
mvNCCompile -w mobilenet_iter_73000.caffemodel -o InferenceNetwork -s 7 deploy.prototxt
If you did part 2, in terminal run the following command:
mvNCCompile -w output/optimized.caffemodel -o InferenceNetwork -s 7 output/optimized.prototxt
| Argument | Description |
|---|---|
| optimized.caffemodel | The optimized.caffemodel generated in part 2. |
| InferenceNetwork | The generated inference network file name. |
| 7 | The number of shaves. |
| optimized.prototxt | The optimized prototxt generated in part 2. |
Part 4 Download Label File
The label text file provides labels for the classes in the inference network file. It can be downloaded from:
https://flir.boxcn.net/s/cvxcyvi8zyt0hzxot24oxcnl2ow2m1r4
Test deep learning with SpinView
Upload inference network file
If using preloaded cat and dog network file, go to the Display inference data section below.
- Open SpinView, select the camera, then switch to the file access tab.
- From the drop-down menu, select Inference Network.
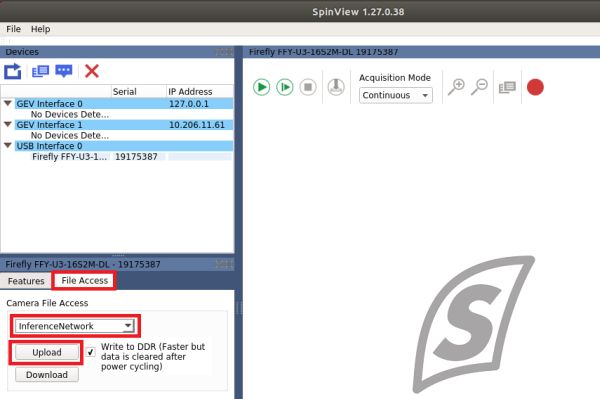
- Click Upload and navigate to your network inference file location. Selecting the file begins the upload.
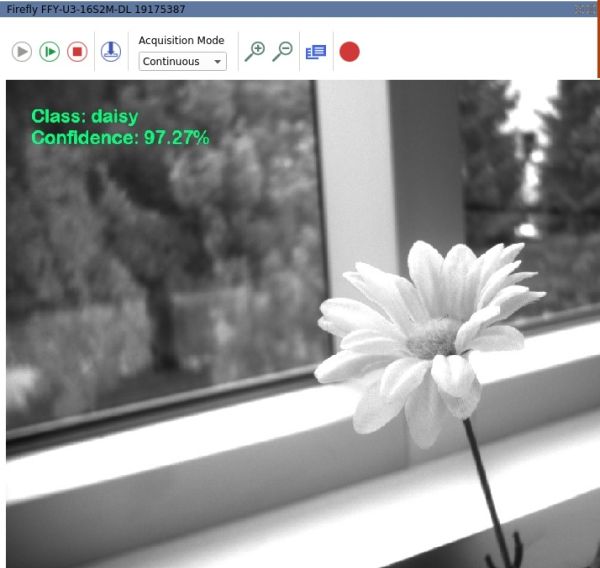
Display inference data
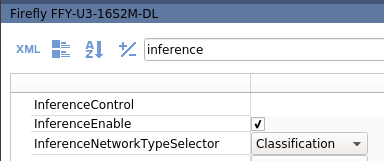
- Open SpinView, select the camera, then switch to the features tab.
- Search for "inference".
For example 1 (and preloaded cat and dog network file), ensure network type selector is Classification.
For example 2, ensure network type selector is set to detection. - Select Inference Enable.
- Search for "chunk".
- Select Chunk Mode Active.
For example 1 (and preloaded cat and dog network file), select Chunk Enable for both Inference Result and Inference Confidence.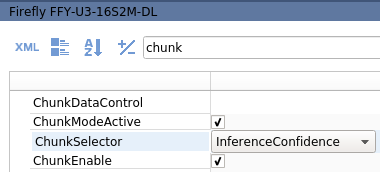
For example 2, select Inference Bounding Box Result. - Right-click on the streaming window, and select Enable Inference Label.
- Click Configure inference label.
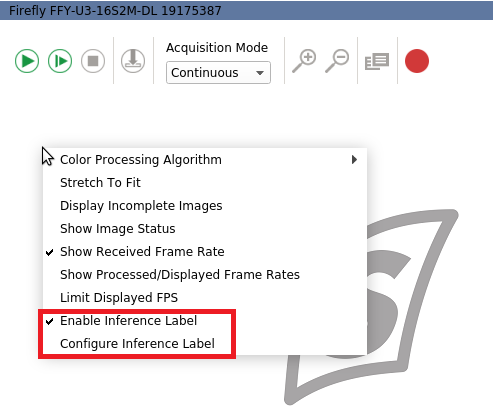
- In the pop up window, click browse to navigate to the label text file and click Apply.
For example 1, navigate to the retrained_labels.txt file created in Part 1.
For example 2, use the retrained_labels_detection.txt file downloaded in Part 4.
For preloaded cat and dog network file, create a text file with cat on the first line and dog on the second line to use as a label file. - Click on the green play icon to start camera acquisition.
Related Articles
-
 Deep Learning
Neural Networks Supported by Neuro on the Firefly-DL
Read the Story -
Deep Learning
Tips for Creating Training Data for Deep Learning Neural Networks
Read the Story -
Deep Learning
Troubleshooting Neural Network Conversion Errors
Read the Story