Constructing Comfortable, Eco-Friendly Homes with Thermal Imaging
A comfortable home that's easy to heat up or cool down affordably is one of the features on every home-owner's wish list. Luckly, thermal imaging allows engineers in the housing industry to clearly see and advocate for the importance of constructing comfortable living environments. Dr. Masayuki Mae, an associate professor at the Faculty of Engineering at the University of Tokyo, shares vital points for creating a comfortable "eco-house."
Since 2008, Dr. Mae has worked on a wide variety of research subjects, including air conditioning, ventilation, hot-water supply, and the use of natural light, all in attempt to realize a true eco-house. He believes that the prerequisites for a comfortable eco-house are “high insulation and airtight performance, and vertical temperature evenness from head to toe.”
Around 2010, Mae began using FLIR thermal cameras to visualize and evaluate the thermal insulation and airtightness of residential buildings. “When I used them for the first time," he says, "I was impressed that IR images apparently showed the difference in comfortability. They help people who have no construction expertise understand the importance of a thermal living environment."
Visualizing "comfortability"
Thermal imaging quickly reveals insulation deficiencies, as well as the airtighness of the construction. Airtightness is an important factor for comfortability, as it influences the effectiveness of heating and air conditioning and the temperature evenness from the floor to the ceiling. International standards (ISO7730) recommend that the temperature difference from head to toe should not exceed 2˚C (3.6˚F) for the living environment to feel comfortable.
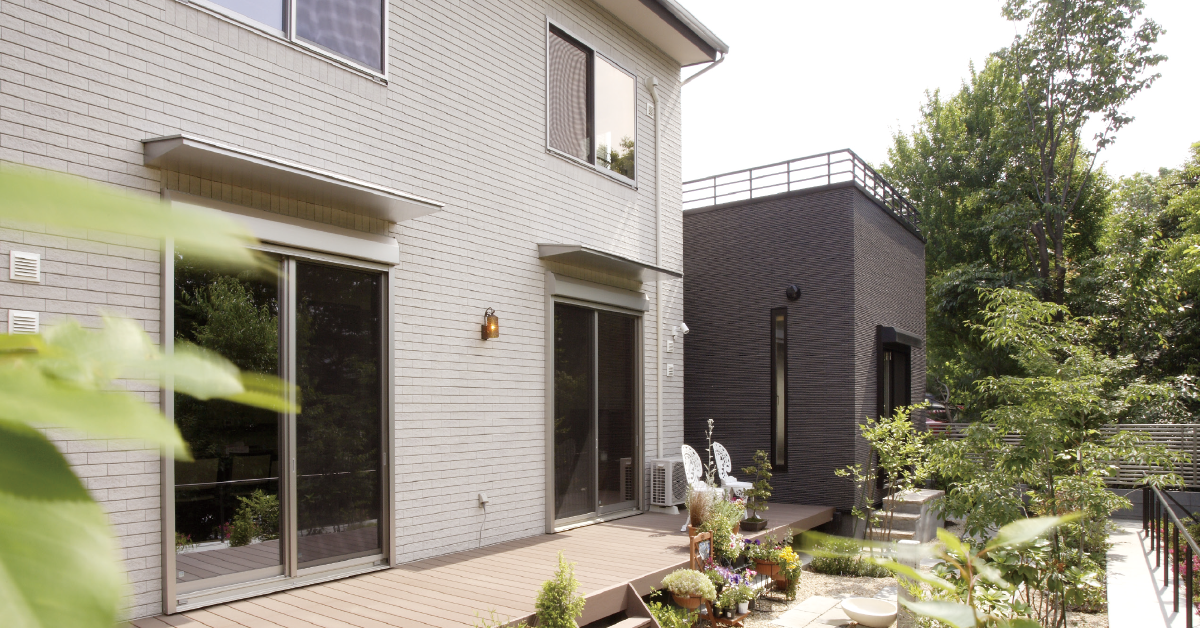
A lack of airtightness causes an inflow of cold and heavy outdoor air to leak in at ground level, increasing the vertical temperature difference. The following images demonstrate this using the temperature profiles of temporary houses constructed by different constructors.
Image 1 is of a steel framed, highly insulated house with double sash windows. While well-insulated, the vertical temperature difference due to low airtightness is significant.
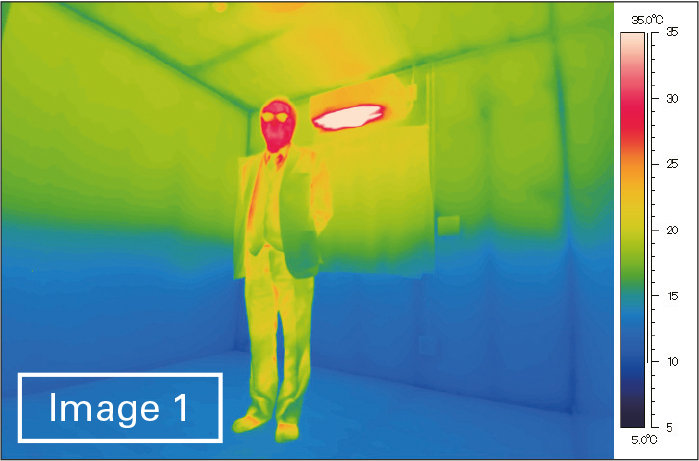
Image 2 is of a temporary wooden house that is highly insulated and airtight. Here, the temperature difference between the ground and ceiling is small.
Thermal images make the differences in indoor thermal environments and comfortability recognizable at a glance. Careful construction work is required to ensure airtightness, which is often seen as less important compared to thermal insulation.
The necessity of large-scale testing for the strict analysis of airtightness may have been an obstacle to widespread recognition regarding the importance of ensuring airtightness. When constructors can easily check airtightness by using thermal cameras, Mae expects that construction accuracy will be enhanced and airtightness will be improved across the industry.
Making the most of thermal cameras
Camera technique greatly impacts the effectiveness of communication to those who aren't so thermal-savvy. Here's some tips from Dr. Mae on taking advantage of thermal cameras to get the best image:
1. Make sure your image composition fits your intended message
First of all, clarify your message, and then determine the shooting angle based on that. For example, take an image from up high to demonstrate the coldness of the floor, and when you want to express the comfortability of a house, include two elements (i.e., a person and a room) in a subject to contrast room and body temperatures.
In a poorly insulated residential building with low airtightness, it is difficult to warm up an entire room, resulting in heavy dependence on warming devices such as heaters.
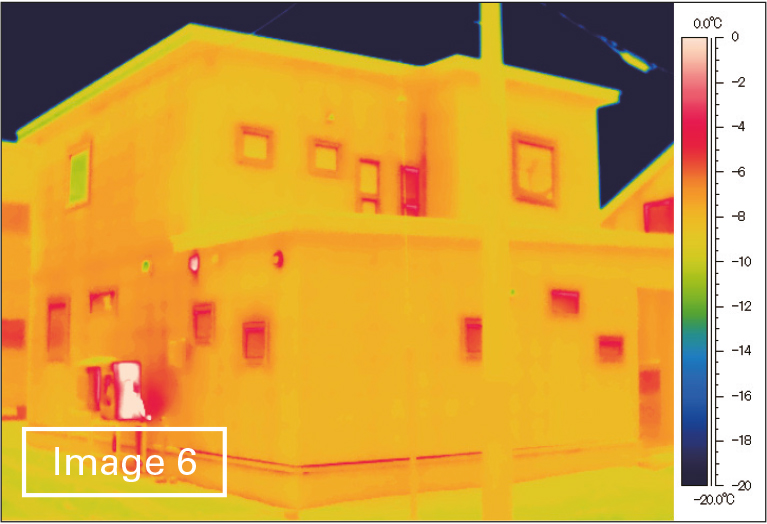
To check heat leakage, take images from the outside.
To check heat leakage, take an image from the outside at night so as to avoid the effects of sunlight.
IR images are also useful in expressing the airflow of an air conditioner or heater. Although a thermal camera can't visualize the airflow, if carefully utilized it can visualize how the ambient temperature is changed by the warm or cold air.
2. Set the temperature range to 5–30˚C (41-86˚F) when shooting rooms in winter
When comparing the indoor environments of different buildings, it is important to use the same temperature scale. In most climates, a temperature scale ranging from 5–35˚C (41-86˚F) is best in the winter. In this setting, what most people would consider a comfortable temperature range of 20–25˚C (68-77˚F) is displayed in yellow. In the summer, the recommended temperature range is 10–40˚C (50-104˚F), taking a seasonal change of clothing into account.
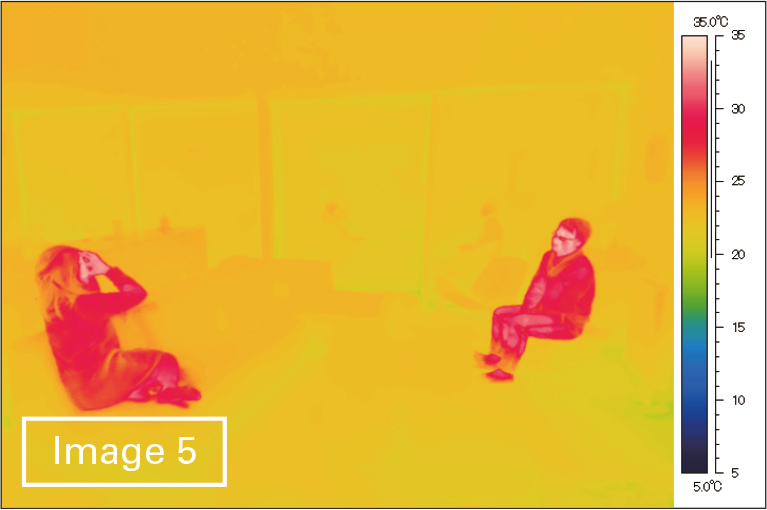
Room of a highly insulated, airtight residential building. The IR image enables the intuitive understanding of a comfortable living space.
3. Take images during the right time of day
There are appropriate times of day and seasons for shooting buildings with thermal cameras. To view thermal insulation performance, take images in the winter during the nighttime instead of the daytime to avoid the effects of sunlight.
In contrast, to express the heat generated by sunlight in summer, take images in the daytime when the sun shines. When comparing different buildings, take images at the same period of time and under similar weather conditions. Although it can be difficult to completely match conditions, taking images under conditions matched as closely as possible is important for making them convincing.
4. Use the appropriate camera and field of view
While a lens with a field of view (FOV) of 45° is enough to find thermal insulation deficiencies, a wide-angle lens of 80° is ideal for visualizing the thermal environment of an entire room. This type of lens enables you to capture IR images that make the state of an entire house recognizable at a glance. If no wide-angle lens is available, you can use image composition software.
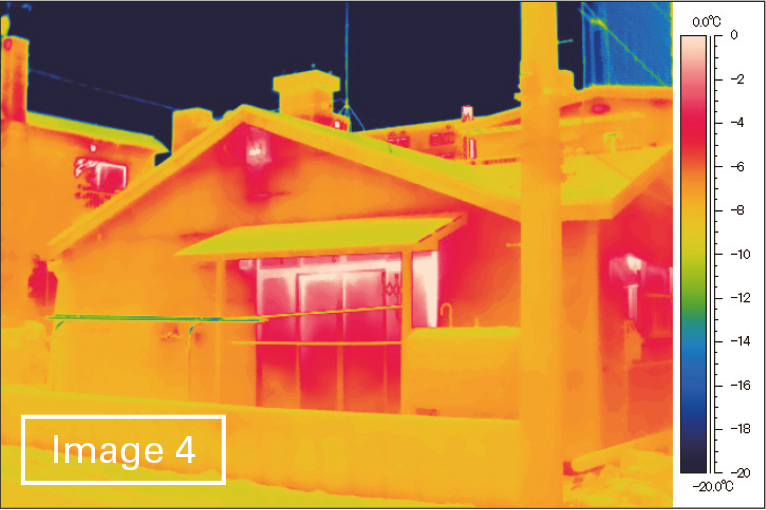
External appearance of a highly insulated residential building: the amount of heat leakage is low.
5. Learn from the thermal images you take
To make the most of your thermal camera, it is important to take a large number of IR images. By verifying the images that you capture and identifying what is different from your expectations, you can deepen your understanding of thermal insulation performance and comfortability.
Also consider acquiring basic knowledge in thermodynamics such as radiation, convection, and conduction, as needed. Thermal images are the best educational tool for visually checking thermal insulation and airtightness.
Communicating the advantages of high-performance buildings
Thermal imaging enables users to visually recognize the thermal characteristics of a cold, poorly insulated house vs. an airtight, high-performance home. Architecture experts can use thermal images to better communicate the values of high-performance buildings to the industry and potential home-owners. "Adding intuitively recognizable visual information to conventional textual and speech advice for living environment improvement," Dr. Mae notes, "can significantly contribute to establishing trust with users.”
Better building performance means more comfort and easier living for residents. Thermal images are an optimal tool for communicating the benefits of living in a high-performance residential building, and helping industry experts pave the way for more insulated, airtight homes.
Learn more about thermal imaging for home energy audits.